C&S Leadville Branch line: Final Trackplan Arrangement
Recording the progress of building the Denver’s RailRoads N Scale layout
All genuine posts are welcomed and will be acknowledged. Please submit your first post by email to: dennis@denversrailroads.com
C&S Leadville Branch line: Final Trackplan Arrangement
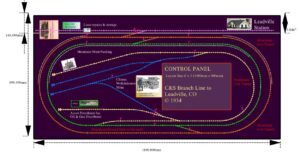
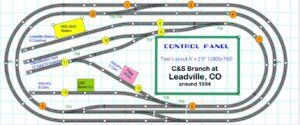
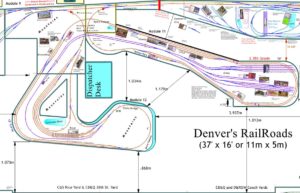
Finished adding the extension and laying the track. As a result the trackplan has changed considerably. The following is the trackplan drawn in both AnyRail and CADRail. AnyRail is great for providing a comprehensive Kato library that snap together. CADRail on the other hand provides more features, such as colours and kit pictures. I am in the process of testing the power to the rails and once that is done I will create the control panel with toggle switches to control the turnouts.
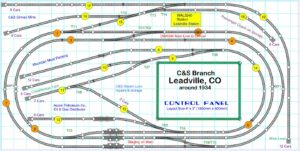
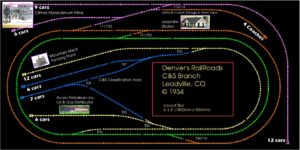
Note that there are only three industries, but they have enough track length to create reasonable train lengths. 12-15 Hopper cars to the Climax Molybdenum Mine, 12 Reefers to the Mountain Meat Packing Plant and 6 tankcars to Acorn Petroleum Inc. Leadville station can accommodate 4 coach passenger trains. For now the loops will have to act as staging tracks but a staging yard could be added to the 12 car mine lead.
C&S Leadville Branch line Trackplan Update
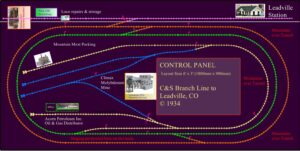
I have been giving a lot of thought to the Leadville Station spur and realised that what was required was the ability for a locomotive to run around it’s train and couple to the rear. The following change to the trackplan – the addition of a second crossover on the right – provides that ability with a minimum of track changes. I have ordered the two extra right-hand #4 turnouts which hopefully will be received by the end of next week.

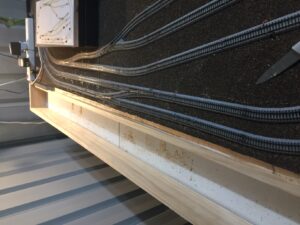
As can be seen I have started work on the 6″ extension to the layout to make room for the Leadville Station spur. Next stage is the installation of the 2″ deep foam roadbed and filling in the gap between the old and new foam, which could be challenging.
Kato Test layout (aka C&S Leadville Branch line) Update
Back on 20th May 2019 I introduced the test layout on the Blog page and detailed a number of objectives, mainly relating to using the test layout to test a whole raft of electronic options. Initially as part of the layout build I installed a number of NCE BD-20 block detectors and DCC accessory control boards. At that time I did learn a lot about using such devices.
However now that I am going to build the layout as a functioning switching layout I do not think it is worth the effort and cost of installing a lot of electronic devices on such a small layout. Signals would look nice but along with block occupancy lights they are quite unnecessary on such a small layout, where you can see at a glance where all the trains are.
Consequently I am going to remove all the BD-20s and save them for the Denver’s RailRoads layout, which I hope to restart early in 2021. That layout will need a lot of electronics to function as planned. The Kato layout only needs a number of of SPDT or DPST spring toggle switches to change the built in motors in the turnouts. It has a single circuit breaker which should be adequate for such a small layout. The Wye/reversing section could cause a few challenges, but we will see.
Making the electrics simple will free my time up to build a complete operating layout before Christmas (2020) that will provide interesting switching challenges. Furthermore there are 3 or 4 kits to build and some interesting mountain scenery to create. I have already installed the two #6 turnouts between the red and green lines which will improve operations considerably. The next task is to make a cut along the white dotted lines (on the updated track plan below) and raise the 3 tracks at the back by an inch or two. That will improve the scenic look of the layout and maybe also raise the track level equal to the back board of the layout making it much easier to add the 150mm (6″) extension to the layout.
C&S Leadville Branch line
Industries
As indicated in my 24th May 2020 blog post I felt that having a Reefer based industry on the layout instead of a Timber based industry would be easier to operate and more in keeping with a small layout based on a railroad set in 1934. The significance of the year 1934 is that it was before 1937 when the use of “billboard” advertising on freight cars was banned by the Interstate Commerce Commission, and thereafter cars so decorated could no longer be accepted for interchange between roads. It was also a year after prohibition ended in 1933!
Unfortunately I could not find a meat packing industry that had existed in Leadville at any time, so I have had to invoke ‘modellers license’ and move the Mountain Meat Packing company from Craig to Leadville. So I have dropped the Smith Lumber company in favour of the Mountain Meat Packing company. I have also moved Acorn Petroleum Inc. to the shorter siding previously allocated to Smith Lumber company. Mountain Meat Packing will be represented by the Woodland Scenics “Clyde & Dale’s Barrel Factory” and placed on the long siding. This should allow for quite a few reefers, boxcars and stockcars. I have also removed the Resurrection Ore Mine as there really was no room for that industry and we already have a Hopper based mine at Climax. The new track arrangement is as follows:
Layout Operations
Trains need to be made up on the front 3 tracks and then be sent around the layout for a few laps and then brought into one of the sidings and switched accordingly. The train then makes a few more laps before going into staging and being reconfigured.
Colorado & Southern (C&S) Branch line to Leadville, CO
The Kato Test Track project is now the Colorado & Southern (C&S) Branch line to Leadville, CO. The original track plan has converted from Anyrail to CADRail and modified to include:
- A second crossover (from the outer loop back to the inner loop) which will improve operations 100%.
- A 150mm (6″) extension to the width increasing the layout size from 6′ x 2 1/2′ to 6′ x 3′ (1800mm x 900mm).
- On this extension will be built a crossover to two tracks – one for Leadville station and one for locomotive repair and storage.
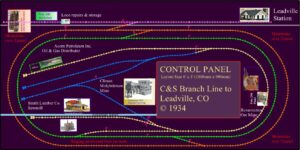
This new track plan will enable me to add 3 – or maybe 4 – industries in addition to the Leadville station and loco facilities. These named industries have actually existed in Leadville in the past but other than the Climax
Molybdenum Mine, may not have had their own railway siding. The industries are:
- The Climax Molybdenum Mine
- Acorn Petroleum Inc.
- Smith Lumber Co.
- Resurrection Ore Mine (this is a maybe if it looks right)
These industries and Leadville station will generate a reasonable amount of traffic in lumber loads, tankcars and hoppers. Boxcars can be delivered to the Leadville siding for team track unloading. I am however thinking of swapping the Smith Lumber Co. industry for a stockcar and reefer based industry. Watch this space.
I have purchased all of the additional turnouts that I need to make the track alterations so work should start soon. Kato track is almost bullet proof but is expensive. Consequently I researched the pricing from the following model railroad stores:
- Hobbytech Toys, Perth – no postage but expensive
- Midwest Model Railroad, Independence, MO, USA – good Kato prices but $45USD postage put them out of the picture
- Aust-N-Rail, Victoria – $10.70AUD postage and $10 per turnout cheaper than Hobbytech clinched the deal. Arrived 5 days after placing the order.
To be continued.
The Kato Test Track project
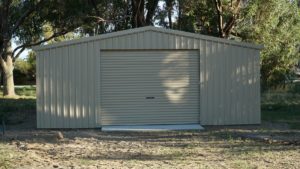
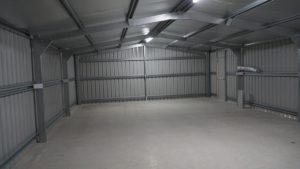
Although Denver’s RailRoad’s cannot be put back together again before December at the earliest the Kato Test Track, described in my 20th May 2019 Blog post, is alive and well and after a quick rub with a Peco track cleaning block I was able to run a locomotive around the loop.
So as I have 6 months with no activity on the main layout I have decided to look to see if I can extend the layout into a workable railroad. The following photos show the layout as it is today.

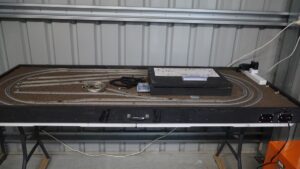
The original trackplan, drawn in Anyrail and built as per the above photos, looked like this:
The Reality of Denver’s RailRoads new home
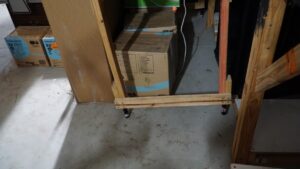
Although Denver’s RailRoads new home is built the home for my wife and two Boxer Dogs is still a fair way off. So this is what it now looks like inside:
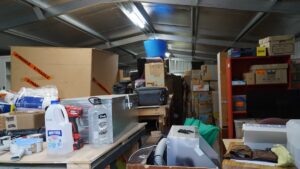
My railway modules are in there – somewhere, along with a couple of hundred storage boxes and some furniture.
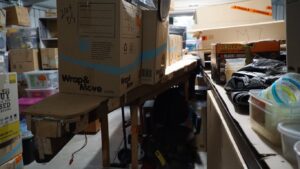
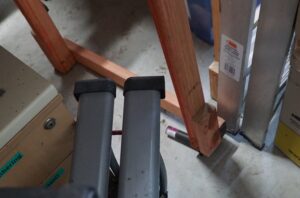
Furthermore, although the modules made the trip ok the adjustable plastic legs (see top photo below), which were strong enough to support the modules, were not strong enough to support the weight placed on top of the modules in the containers (see bottom photo below). That’s a big deal as I have no idea of how I am going to lift the modules and attach new extension legs. I may have to build new L girder supports and then detach the modules from their current L-girder supports and move them (with some help) over. I would like to raise the bench-work by about 4″ so that’s a strong probability.
CB&Q 38th St. Yard & UP 36th St Yard added to Trackplan
With the extra meter added to the length of the new garage I have been able to design a small but adequate yard to represent the CB&Q 38th St. Yard and the UP 36th St Yard. They would never have shared the trackage but on my layout they will have to! I now have a 3 reasonable sized yards, the D&RGW North Yard, the C&S Rice Yard and this new CBQ-UP yard.
The new yard is alongside the D&RGW North Yard but only has one crossover connection to allow trains to enter Denver Union Station directly or via the Wye used for turning passenger trains. The crossover also provides access to the engine facilities for both UP and CBQ on the station module. Two yard leads have been provided, one back at Utah Junction and the other doubles with the UP industrial trackage that ran alongside Wynkoop Street.
![]()
Updated Denver’s RailRoads Track Plan
As long as the track has not actually been laid the Denver’s RailRoads track plan is open to change! The latest change is the moving of Module 12 down by about 18″ giving an aisle space of about 3′ (1m) all the way around the module. A large area of 4m x 1.8m (12′ x 5′) has also been created in the Prospect Junction area. Although I am tempted to add more track I do not intend to do so, or at least not before the current track is laid as planned. Having said that, the movement of Module 12 to increase the aisle space between Modules 11 and 12 has resulted in an increase of 11″ – 21″ to the tracks departing Bond for Glenwood Springs and for the passing siding going into Gore Canyon. This siding, or passing track, can now hold 36 40′ freight cars, 2 Locomotives and a Caboose.
Given that the Winter Park to Granby passing track can hold a 48 car train my goal of running trains of around 20-30 freight cars is very doable. The staging tracks at Grand Junction can hold trains of between 25-30 cars. The staging tracks on the Joint Line are shorter but 3 tracks can hold 25 car trains. The snip below shows the new positioning of Modules 11 & 12. To view the latest version of the full track plan click here.
Finally the Walls are Up and Denver’s RailRoads new home is ready for business
Our new 42′ x 22′ (13m x 7m) layout room is ready. Ultimately it will house my 37′ x 16′ N Scale layout built as an island with a 3′ aisle all the way around and a large 4′ (1.3m) aisle in the centre together with a 12′ x 8′ (3.8m x 2.4m) crew lounge area. The layout will be the exact same configuration as the old Townsville layout, expect that the Prospect Jct. module 5b (see track plan at https://denversrailroads.com/Denver/DR-Layout/DR110.JPG) is now 3′ wider and consequently the tracks have been re-designed to take advantage of the extra space and to create a better Wye at the entrance to Denver Union Station.
A longer run could have been created by building the layout against the walls of the Garage. However that would have meant a module depth of only 18″. By building the layout as an island the full 3′ depth can be utilised. This design choice is particularly effective for the Denver Union Station and return loop modules.
Unfortunately the Garage must be used to store household furniture and the like until the Home is built later this year. But once all that stuff is removed the outside modules should bolt back together with a minimum of effort as they were placed in the container with their legs intact. The centre modules had to be transported without their legs so will be somewhat challenging to connect to the outside modules.